 从零搭建 vite+vue3+ts+pinia 框架
使用 vite 脚手架搭建 vue3+ts+element 项目
# vite
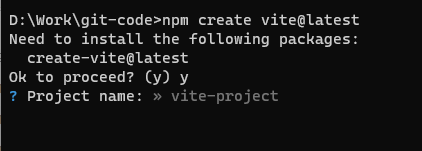
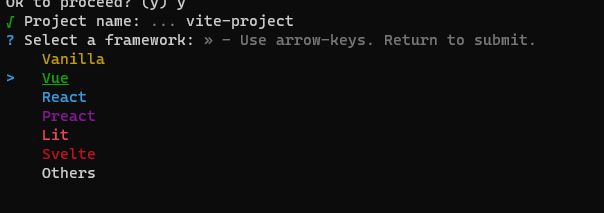
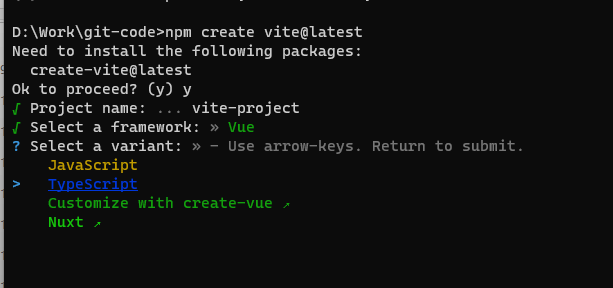
# 搭建项目
npm create vite@latest
1
# element
element 中文网 (opens new window)
# 安装
npm install element-plus --save
1
import { createApp } from "vue";
import ElementPlus from "element-plus";
import "element-plus/dist/index.css";
import App from "./App.vue";

const app = createApp(App);

app.use(ElementPlus);
app.mount("#app");
1
2
3
4
5
6
7
8
9
2
3
4
5
6
7
8
9
# 定制主题
除了 scss 引入的方式,还可以配置 vite 增加引入
$--colors: (
  "primary": (
    "base": green,
  ),
  "success": (
    "base": #21ba45,
  ),
  "warning": (
    "base": #f2711c,
  ),
  "danger": (
    "base": #db2828,
  ),
  "error": (
    "base": #db2828,
  ),
  "info": (
    "base": #42b8dd,
  ),
);

@forward "element-plus/theme-chalk/src/common/var.scss" with (
  $colors: $--colors
);
@use "element-plus/theme-chalk/src/index.scss" as *;
1
2
3
4
5
6
7
8
9
10
11
12
13
14
15
16
17
18
19
20
21
22
23
24
25
2
3
4
5
6
7
8
9
10
11
12
13
14
15
16
17
18
19
20
21
22
23
24
25
import { createApp } from "vue";
import ElementPlus from "element-plus";
import "./styles/variable.scss";
import "./styles/index.scss";
import App from "./App.vue";
let app = createApp(App);

app.use(ElementPlus);
app.mount("#app");
1
2
3
4
5
6
7
8
9
2
3
4
5
6
7
8
9
# 按需引入
使用此插件后,不需要手动编写 import { Button } from 'ant-design-vue'这样的代码了,插件会自动识别 template 中使用的自定义组件并自动注册。
unplugin-vue-components (opens new window)
npm install unplugin-vue-components -D
1
import Components from 'unplugin-vue-components/vite' // 按需加载自定义组件
import { ElementPlusResolver, AntDesignVueResolver} from 'unplugin-vue-components/resolvers'

export default defineConfig {
  // ...
  plugins: [
    // 按需引入
    Components({
      dts: true,
      dirs: ['src/components'], // 按需加载的文件夹
      resolvers: [
          ElementPlusResolver(),
          AntDesignVueResolver({
              // 参数配置可参考:https://github.com/antfu/unplugin-vue-components/blob/main/src/core/resolvers/antdv.ts
              // 自动引入 ant-design/icons-vue中的图标,需要安装@ant-design/icons-vue
              resolveIcons: true,
            })
     ] // ElementPlus按需加载
    })
  ],
  // ...
}
1
2
3
4
5
6
7
8
9
10
11
12
13
14
15
16
17
18
19
20
21
22
2
3
4
5
6
7
8
9
10
11
12
13
14
15
16
17
18
19
20
21
22
// tsconifg.json
{
  "include": [
    "src/**/*.ts",
    "src/**/*.d.ts",
    "src/**/*.tsx",
    "src/**/*.vue",
    "./auto-imports.d.ts",
    "./components.d.ts"
  ]
}
1
2
3
4
5
6
7
8
9
10
11
2
3
4
5
6
7
8
9
10
11
# 增加全局路径配置@
// vite.config.ts
export default defineConfig({
  resolve: {
    alias: [
      {
        find: "@",
        replacement: "/src",
      },
    ],
  },
});
1
2
3
4
5
6
7
8
9
10
11
2
3
4
5
6
7
8
9
10
11
// tsconfig.json
  "compilerOptions": {
    "baseUrl": ".",
    "paths": {
      "@/*": [
        "./src/*"
      ]
    },
  }
1
2
3
4
5
6
7
8
9
2
3
4
5
6
7
8
9
# router
router 中文官网 (opens new window)
npm install vue-router@4
1
import { createRouter, createWebHashHistory } from "vue-router";

const routes = [{ path: "/test", component: () => import("@/pages/Test.vue") }];

const router = createRouter({
  history: createWebHashHistory(),
  routes,
});

export default router;
1
2
3
4
5
6
7
8
9
10
2
3
4
5
6
7
8
9
10
import router from "./router";
app.use(router);
1
2
2
安装成功后在 main.ts 引入 router,使用 ts 出现找不到模块的问题!
// vite-env.d.ts
declare module "*.vue" {
  import { DefineComponent } from "vue";
  // eslint-disable-next-line @typescript-eslint/no-explicit-any, @typescript-eslint/ban-types
  const component: DefineComponent<{}, {}, any>;
  export default component;
}
1
2
3
4
5
6
7
2
3
4
5
6
7
# Pinia
# 安装
npm install pinia
1
# 使用
// main.ts
import { createPinia } from "pinia";

app.use(createPinia());
1
2
3
4
2
3
4
import { defineStore } from "pinia";

export const useStore = defineStore("main", {
  state: () => ({
    counter: 0,
  }),
  actions: {
    increment() {
      this.counter++;
    },
  },
});
1
2
3
4
5
6
7
8
9
10
11
12
2
3
4
5
6
7
8
9
10
11
12
<script setup lang="ts">
import { useStore } from "@/store";
const store = useStore();
const changeCounter = function () {
  store.increment();
};
</script>

<template>
  <p>这是counter{{ store.counter }}</p>

  <el-button @click="changeCounter" type="primary">哈哈哈</el-button>
</template>
1
2
3
4
5
6
7
8
9
10
11
12
13
2
3
4
5
6
7
8
9
10
11
12
13
上次更新: 2024/01/18, 10:44:15